Do you remember when my girls and I were making soap? Well, they are still making soap. Whenever I´m nice enough to buy that stuff for it. Our whole kitchen smells like mayflower, lavender and rose, like a perfume store, all the time. And I think we could stay clean for a decade, (now that sounds like the confession of a drug addict...) if we were only allowed to use it :)
So I thought when we allready learned how to use the microwave, chop stuff into small pieces and melt and mix it, why not try something else? This brought me to our newest project, candles.
I guess you have the materials at home allready - wax, in the form of old candles, to chop.
Crayons to melt with the wax, to add color. You can buy special colorsticks for that in the craftstore, they might be more intense, but we took crayons and were quite happy with the result.
 We also tried foodcoloring, but the colors we had were waterbased, so of course they didn´t mix.
Cottonstring for the wick.
An old can to melt the wax in, and an old fork to stir from time to time.
 Yep, the microwave didn´t turn out so nice, because it doesn´t melt the wax evenly, and I read it could even start to burn in your microwave. So we used a nipper to hold the can in the water - remember, wax is fat, and fat is lighter than water. This is another nice way of explaining this to your children.
 You could also include glitter or essential oils.
And you need something to pour the wax into. Our first try was very plain and simple:

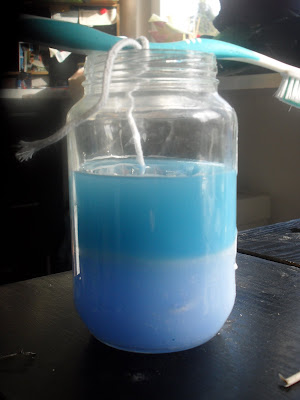
We poured wax into an old glass. It makes sense to attach the wick with some dough at the bottom of the glass, and, as you can see, we used an old toothbrush to keep it straight. Just because it happened to be there. In the kitchen. Well, yeah. That´s how we roll. But see how nice the color matches the candle? :)
Next try: The hole in the sand.
 Simply form a shape (or let your kids do that, add a wick, and pour some wax in there:
  The result is an unevenly shaped candlelike thing with wax sticking to the sides which you can either use as a flooating candle, or leave it in the bowl with sand when you burn it. But it´s a fun experiment, and my kids were thrilled to pour the wax into the sand. So, it´s worth it.
 And as for the nice, smooth straight candles, I admit I bought a ready made mould.
 But I read that you could also use toilet paper rolls, if you close the bottom with playdough.
 Oh, and Ronni tried her icecubetrays again for tiny floating candles. Which are too tiny to float, but she likes them anyway:

So... this is a project for kids. One with hot substances that might burn. But I believe that kids ought to learn how to handle that, too. My daughters are six and eight years old, but it´s best you decide for yourself if you find this appropriate. And it´s also fun for grown ups, believe me. I hope this brings you in the mood to try this yourselve - once you´re hooked, your kitchen won´t be the same :)
So, my husband claims the internet, and after this long tutorial, I could go outside, smoke my goodnight-cigarette and have a look if I can see the stars over our garden.
And I´ll be back tomorrow for Project Smile, because by now I have lots of smiles for my collection, and I´d also like to answer some comments. Which I, by the way, love. My music for today is: I don´t like the original of this song, but I think this cover is just awesome. They add so much more tension to the song, and the lyrics are fun, too. Okay, I could do without the strange dance moves, but well, this song does make you dance, right?

2 comments:
great to see you on Craft Schooling Sunday, and I really enjoyed reading about all your candle making adventures! all the best!
What a cool tutorial...love the crayon tip too. Your candles turned out great!
Good job!
Post a Comment